Guide
Installation & User Guide 설치 및 사용법 가이드 安裝與使用指南
ZeliDesk is now on the Microsoft Store — install it with a single click. ZeliDesk가 Microsoft Store에 정식 출시되었습니다 — 클릭 한 번으로 설치하세요. ZeliDesk 已正式登陸 Microsoft Store — 一鍵即可安裝。
Step 01
Open the ZeliDesk page on the Microsoft Store and click 'Install' (or 'Get'). No certificate setup, no manual files — the Store handles everything.
Microsoft Store의 ZeliDesk 페이지를 열고 '설치'(또는 '다운로드') 버튼을 누르세요. 인증서 등록도, 파일 다운로드도 필요 없습니다 — 스토어가 전부 처리합니다.
開啟 Microsoft Store 的 ZeliDesk 頁面,點擊 「安裝」(或「取得」)。無需憑證設定、無需手動下載檔案 — 商店會處理一切。
Get ZeliDesk on the Microsoft Store
Microsoft Store에서 ZeliDesk 설치하기
前往 Microsoft Store 安裝 ZeliDesk
Step 02
Once installation finishes, launch ZeliDesk from the Start menu. Updates arrive automatically through the Store from now on.
설치가 끝나면 시작 메뉴에서 ZeliDesk를 실행하세요. 이후 업데이트는 스토어를 통해 자동으로 배송됩니다.
安裝完成後,從開始功能表啟動 ZeliDesk。之後的更新將透過商店自動送達。
Legacy guide: direct MSIX install (ARM64 / offline) — certificate setup required. Not needed for Store installs. 레거시 가이드: MSIX 직접 설치 (ARM64/오프라인용) — 인증서 수동 등록 필요. Store 설치 시에는 불필요합니다. 舊版指南:直接安裝 MSIX(ARM64/離線用)— 需手動註冊憑證。透過商店安裝則不需要。
Step 01
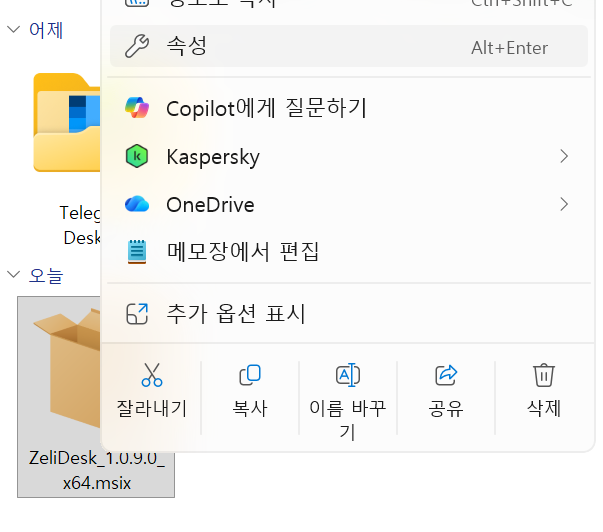
Right-click the installation file (.msixbundle) and select 'Properties'.
설치 파일(.msixbundle)을 우클릭하고 '속성'을 선택합니다.
對安裝檔案 (.msixbundle) 按右鍵,選擇 「內容」。
Step 02
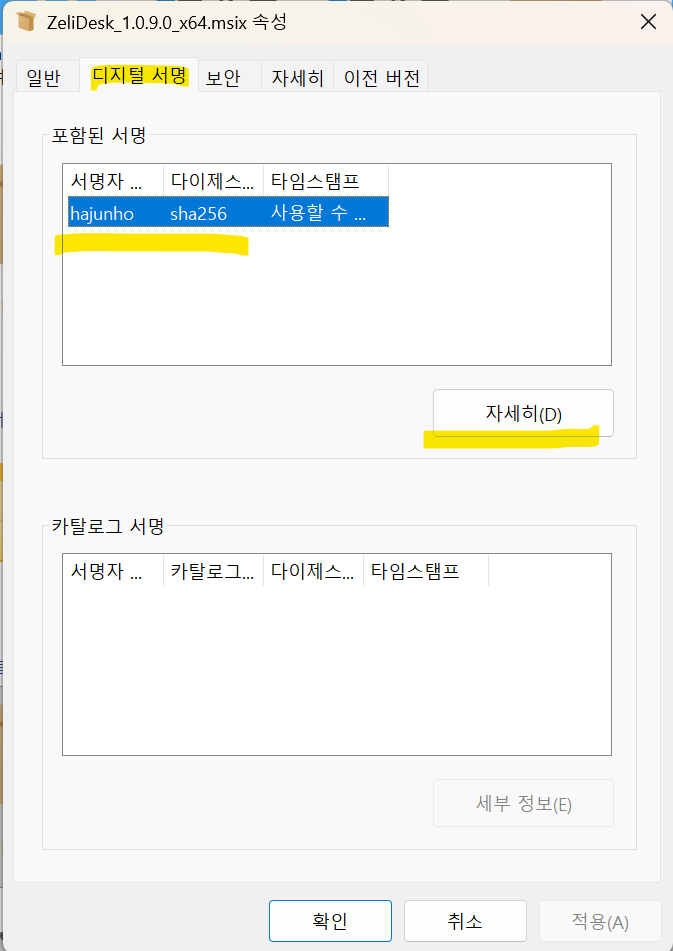
Go to the 'Digital Signatures' tab and select the certificate from the list.
'디지털 서명' 탭으로 이동하여 서명 목록의 인증서를 선택합니다.
進入 「數位簽章」 標籤頁,從清單中選取憑證。
Step 03
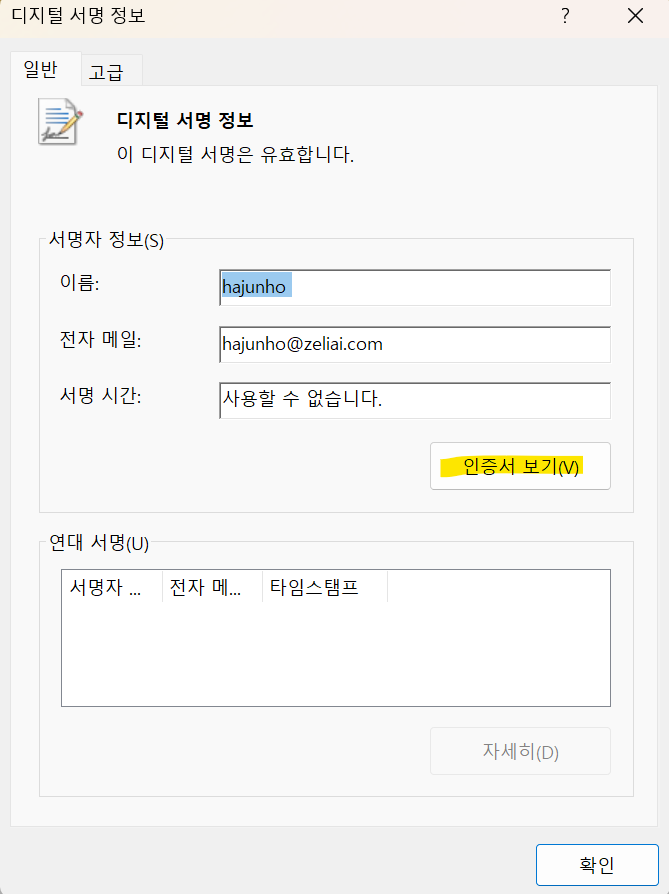
Click the 'Details' and then 'View Certificate' button.
'자세히'를 누르고 '인증서 보기' 버튼을 클릭하여 세부 정보를 엽니다.
點擊 「詳細資料」,接著點擊 「檢視憑證」 按鈕。
Step 04
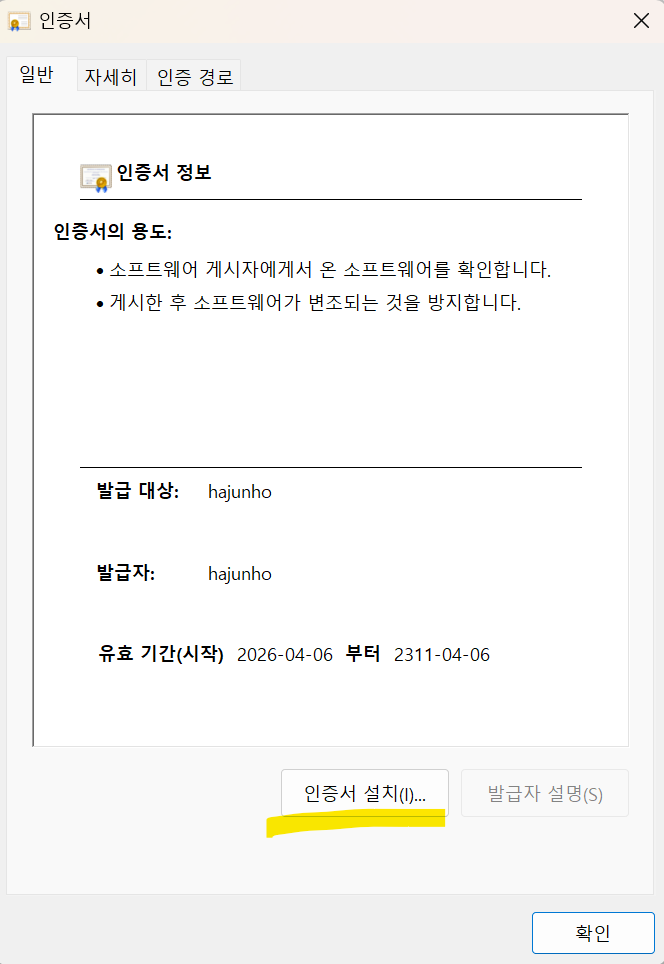
Click the 'Install Certificate...' button.
'인증서 설치' 버튼을 클릭합니다.
點擊 「安裝憑證...」 按鈕。
Step 05
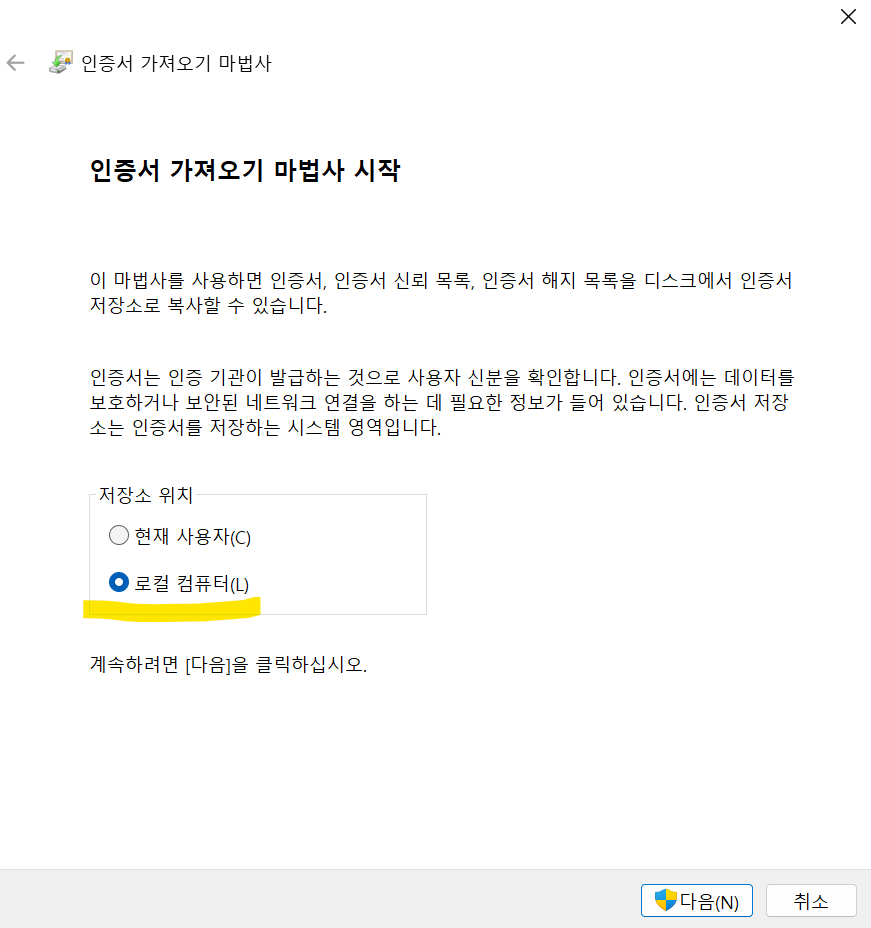
Select 'Local Machine' for the Store Location and click Next.
저장소 위치에서 '로컬 컴퓨터(Local Machine)'를 선택하고 다음을 누릅니다.
在存放位置選擇 「本機電腦」,然後點擊下一步。
Step 06
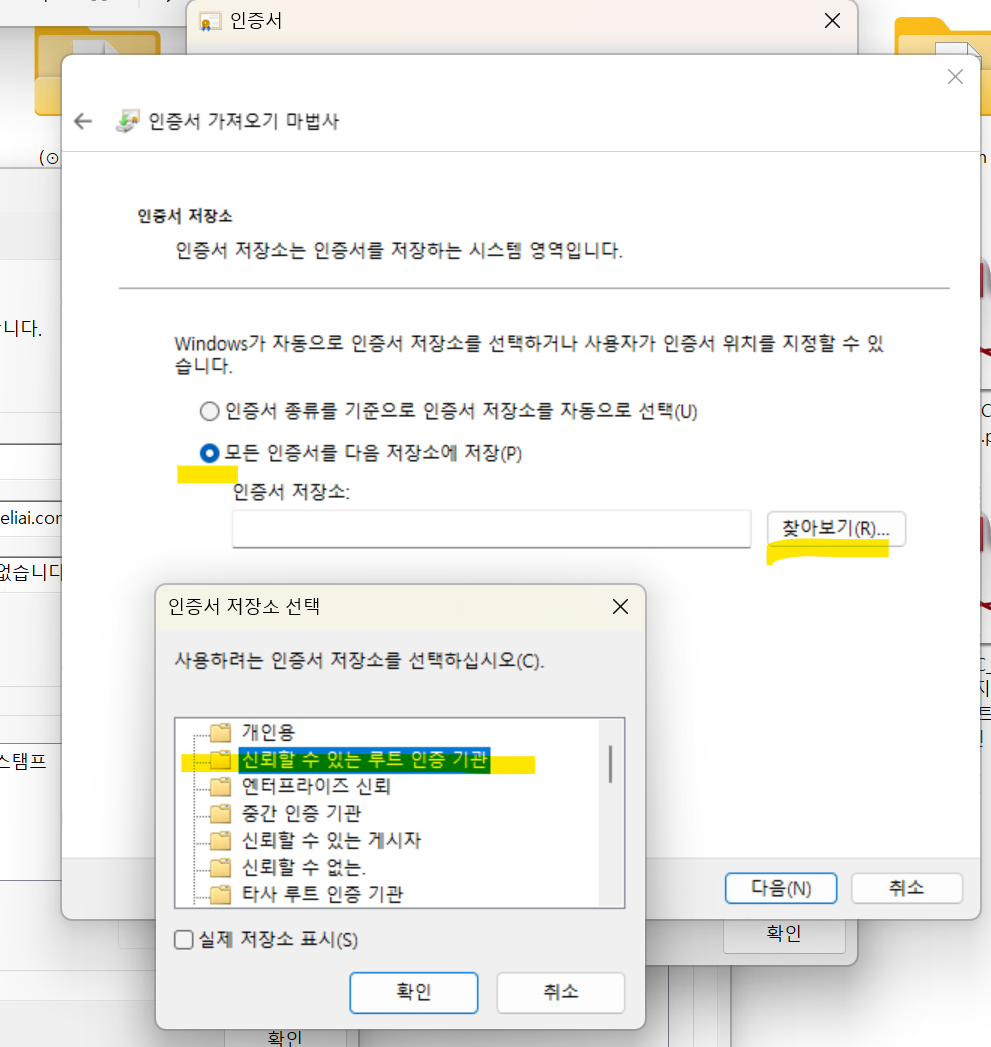
Choose 'Place all certificates in the following store', click Browse, select 'Trusted Root Certification Authorities', and click OK, then Next.
'모든 인증서를 다음 저장소에 저장'을 선택한 후, 찾아보기를 눌러 '신뢰할 수 있는 루트 인증 기관' 폴더를 선택하고 '확인', '다음'을 누릅니다.
選擇 「將所有憑證放入以下的存放區」,點擊瀏覽,選擇 「受信任的根憑證授權單位」,點擊確定,然後下一步。
Step 07
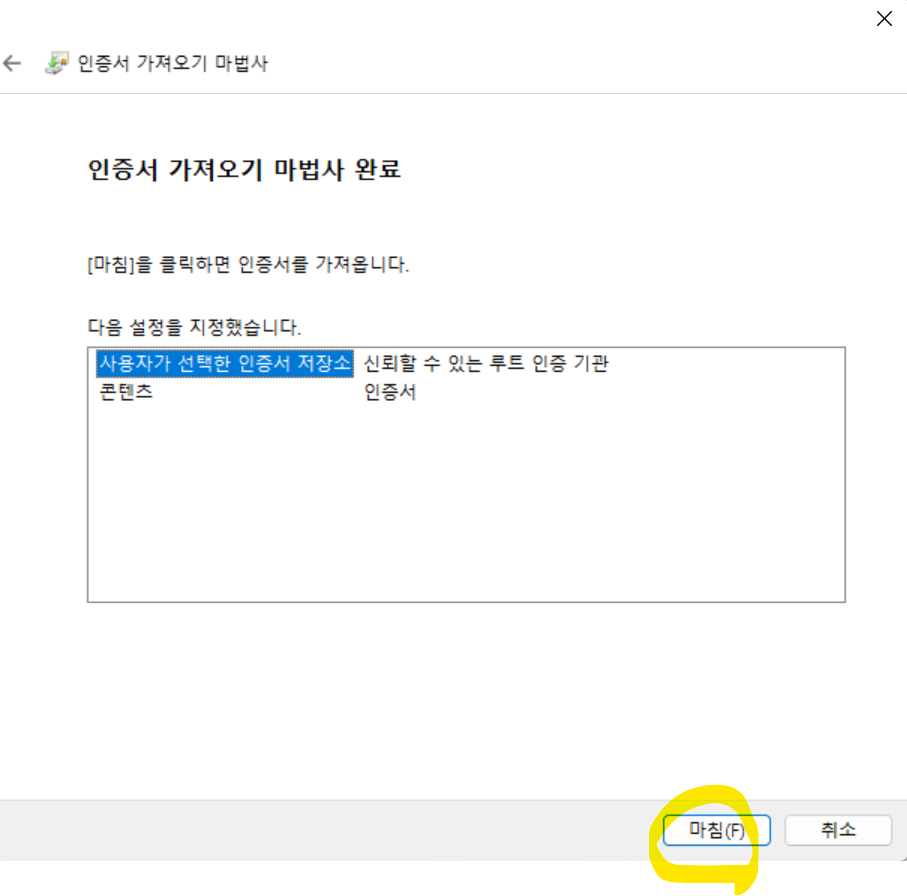
Confirm the success message indicating the import was successful. Click 'Finish'.
인증서 설치가 성공적으로 완료되었다는 메시지를 확인합니다. '마침'을 누릅니다.
確認顯示匯入成功的訊息後,點擊「完成」。
Step 08
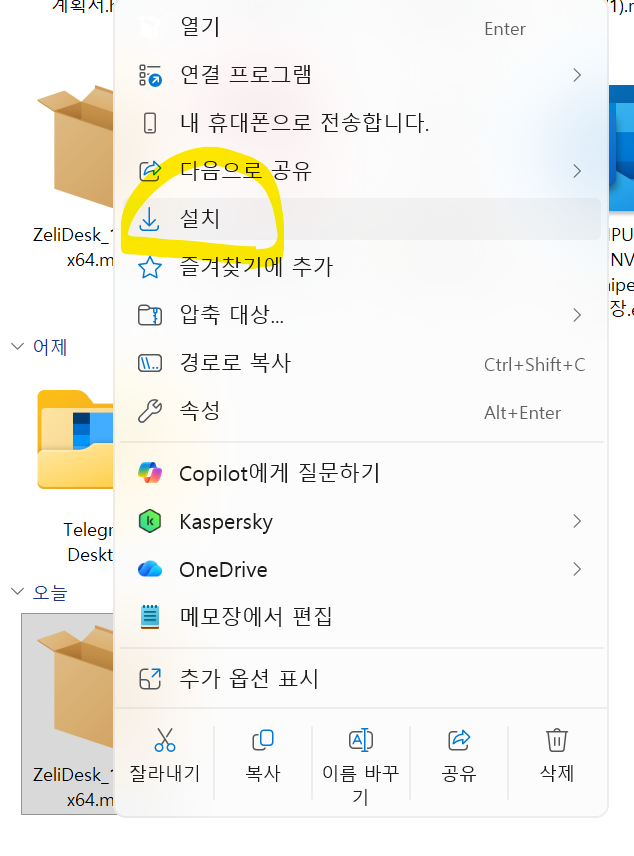
Now, run the ZeliDesk installation file again and click the 'Install' button.
이제 ZeliDesk 설치 파일을 다시 실행하고 '설치' 버튼을 클릭합니다.
現在,重新執行 ZeliDesk 安裝檔案,然後點擊 「安裝」 按鈕。
Step 09
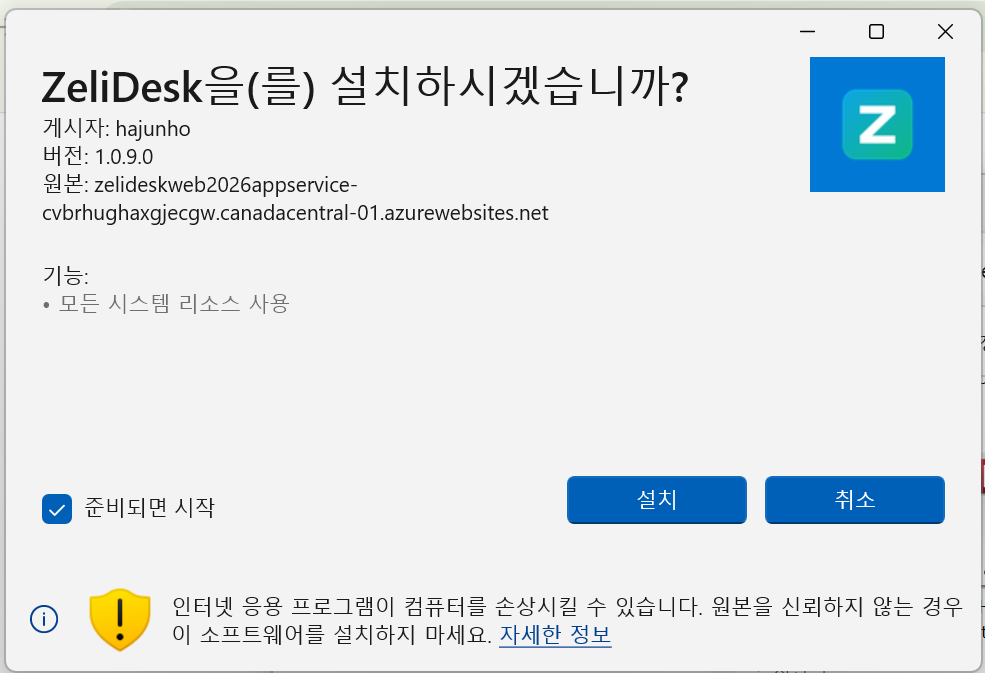
Once installed, ZeliDesk will launch automatically!
'설치'가 완료되면 ZeliDesk가 자동으로 실행됩니다!
安裝完成後,ZeliDesk 將會自動啟動!